
At Belvista Studios we use Articulate Storyline to create our eLearning courses. This blog series is therefore relevant to this program. Whilst saying this, the tips that will be discussed can be taken and used with other programs, though the technical side of how to action them may differ.
An important part of an eLearning course is the ability for the learner to navigate through the course with ease.
Imagine you are completing a course that has amazing content and an engaging design. Now I want you to imagine that you find yourself on the first screen looking around trying to figure out how to get to the next screen. There doesn’t seem to be an obvious action that you can make and you start to lose interest. You look away from your screen, sigh with frustration and notice you have a notification on your phone. You check your phone, decide it’s time for a coffee and walk away from your computer screen. That eLearning course that originally had so much potential has now been left and it is uncertain of when it will be revisited. Probably when you have more patience to figure out how to navigate it. Don’t let this happen to your course. A simple navigation bar creates user-friendly learning, that enables your learner to navigate their way through the course with ease. Give your course the usability it deserves.
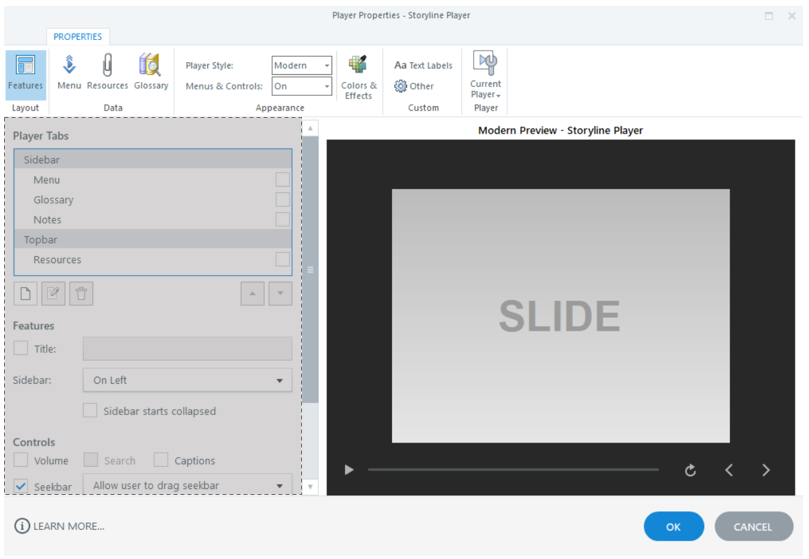
Articulate Storyline does come with its own default navigation that can be accessed through the ‘Player’. Here you can add navigation options for functions such as volume, a seek bar and even a menu that displays on each screen of your course.
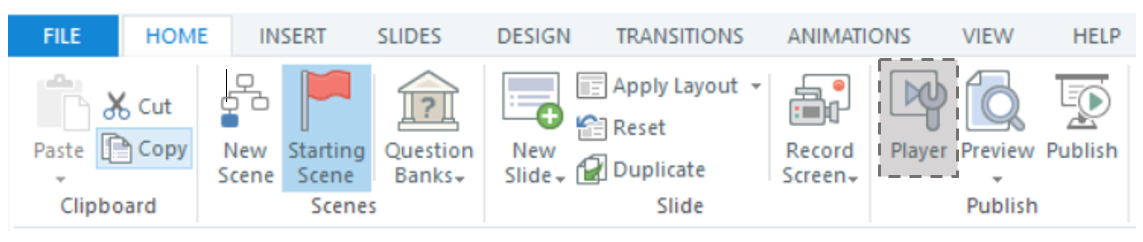
Accessing the ‘Player’ settings.
There does come a time where you may want to create a navigation bar that is more customised to the look and feel of your design and that allows you to have more flexibility over the type of navigation that you include in your course. If this is you, you have come to the right place!
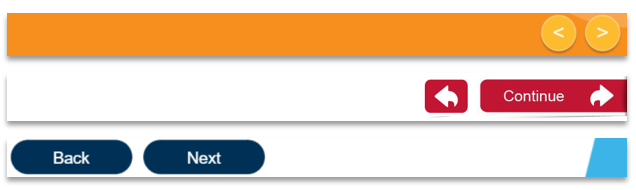
Check out the example below to view the difference between a default Articulate Storyline navigation bar compared to a customised one that we created.
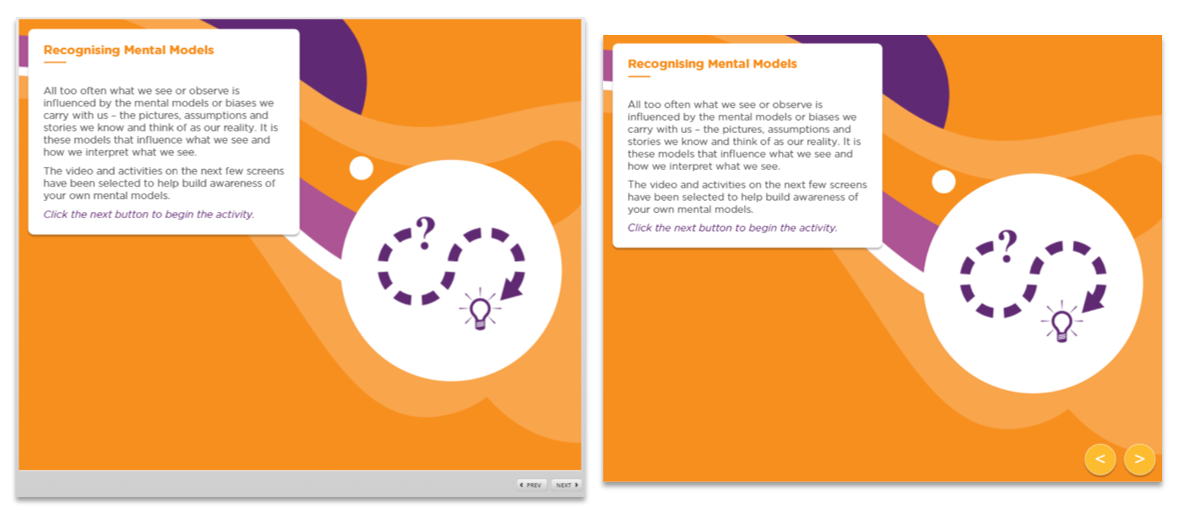
Default Articulate Storyline Navigation versus Customised Navigation.
This blog will show you how to create a navigation bar that consists of a previous button and next button. You can of course add extra navigation that aligns with the requirements of your course. You will just need to allocate appropriate triggers to each button so that they do what they need to do.
Step 1: Remove the Default Articulate Storyline Navigation
Firstly, you need to remove the default Articulate Storyline navigation. To do this, you need to de-select the ‘Slide Navigation Controls’ from the ‘Slide Properties’ window. In this case you would de-select ‘Prev’ and ‘Next’. By default each screen will show the navigation features that are enabled in the 'Player' window (we will get into this next) though you can customise the player features on a screen-by-screen basis. Underneath where it says 'Player features' we will leave 'Player defaults' selected for each screen so that the navigation is consistent throughout.
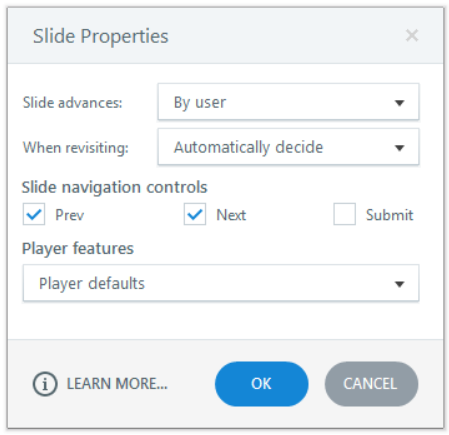
Slide Properties Window.
You can access this window by clicking into the ‘Slide Properties’ for each screen. You can access the ‘Slide Properties’ by double clicking on the screen in the right toolbar (shown below).

Accessing the ‘Slide Properties’ Window.
Another quick way of doing this is by clicking on a screen within a scene and using Ctrl-A to select all screens at once in 'Story View'. The ‘Slide Properties’ will appear on the right side of the screen and you can deselect the ‘Prev’ and ‘Next’ button so that it applies to all the screens that you have selected.
Then go into the ‘Player Properties’ and customise the rest of the player to work with the custom navigation that you want for your course. This screen will show you the navigation that can be included in your course and shows what your course will look like as you make the changes. Untick all of the options in the left toolbar to remove the Articulate Storyline default navigation.
Player Properties Window.
Step 2: Create your Customised Buttons
Now that you have removed the default Articulate Storyline navigation bar, you can create your own customised buttons. This can be done in a range of ways and depends on the look and feel of your course.
Create your previous button, next button and any other buttons that you would like to include in your course navigation. Some examples of customised buttons that we have made are shown below. These buttons can come from Shutterstock, be made through shapes and icons directly in Articulate Storyline or through using Adobe Illustrator. Use a program that works for you and allows you to achieve the look and feel that you desire.
Belvista Studios Navigation Buttons.
Once you have narrowed down how you would like your buttons to look, you need to add triggers to the buttons so that they do what you want them to do. This is what the triggers for the previous and next button would look like.
Previous Button: “Jump to Previous Slide”
Next Button: “Jump to Next Slide”
It is important to note that the “Jump to Previous Slide” trigger goes to the last visited slide and not the previous slide as shown in the story view of your development file. In some instances, to ensure that the navigation functions properly it is safer for the trigger to direct to specific slides or scenes. This will impact what will be discussed in step 3 and means that rather than having your buttons on master slides you will need to paste them onto each screen and add in the appropriate triggers for that particular screen.
3. Place the Buttons into their Position
Now that you have the look and feel of the buttons completed and they have the appropriate triggers attached to them you can place them into a position on the screen.
We recommend that you place the navigation buttons on your master screens as this means you won’t need to copy and paste the buttons onto every screen, they will just appear as part of the layout. Another bonus with this is if you want to make changes to your navigation, you can do it once, rather than individually on every screen. To access the ‘Slide Master’ click on ‘View’ on the top toolbar and then click ‘Slide Master’.

Accessing the Slide Master.
Place your buttons exactly where you would like them on each screen. The buttons should be in the same position on every screen, this creates consistency and the learner will become familiar with how to navigate the course, therefore creating a better user experience. It is easy to achieve this with ‘Master Slides’ as you position the buttons once and they then appear in that position on every screen that uses that 'Master Slide' 'Layout'. It is important to note that the master slide content sits behind the content that you develop on your screens. It is therefore important that the content that you add to each screen doesn’t cover up the navigation on the ‘Master Slide’.
If there are instances where you may only require certain buttons on certain screens you can make different master slide templates. For example, one screen may not require a previous button and therefore you could have a ‘Master Slide’ that does not include a previous button and could be called ‘Without Previous Button’.
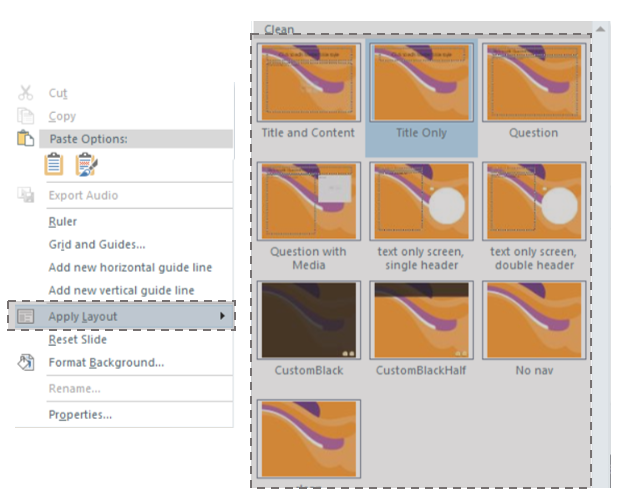
4. Apply your Navigation to the Screens
Now that you have your navigation master screens ready you can go into your project and apply the appropriate master slide ‘Layout’ to each screen. We highly recommend creating your master slides (including navigation) prior to starting to develop your project. This means that each time you add a screen you can select the appropriate layout first up, rather than going through all the screens after developing and applying the layout then. Being organised from the beginning creates a smoother development process and you can catch any problems with the master slide or the way the content is presented early on in the process.
If there are instances where you may only require certain buttons on certain screens you can make different master slide templates. For example, one screen may not require a previous button and therefore you could have a ‘Master Slide’ that does not include a previous button and could be called ‘Without Previous Button’.
4. Apply your Navigation to the Screens
Now that you have your navigation master screens ready you can go into your project and apply the appropriate master slide ‘Layout’ to each screen. We highly recommend creating your master slides (including navigation) prior to starting to develop your project. This means that each time you add a screen you can select the appropriate layout first up, rather than going through all the screens after developing and applying the layout then. Being organised from the beginning creates a smoother development process and you can catch any problems with the master slide or the way the content is presented early on in the process.
Applying a layout to a screen.
You now have a customised navigation bar that aligns with the look and feel of your course and does what it needs to do through appropriate triggers. We hope that this Articulate Storyline Tips blog added value to you and that it enables you to create an engaging and user-friendly course that doesn’t have your learner sighing in frustration and turning their back on it for a notification or coffee. How do you create your navigation bars? Do you create your own customised version? If so, we would love to hear about it!


0 Comments
We'd love to hear from you. Send us a message and connect!
Emoji